
Wednesday, December 31, 2014
Medium-Size Afghan
In pink with two grey boucle stripes (with pink incorporated in the grey yarn). Came out square-ish, which was not my intention, but I didn't have any more of the grey yarn to keep going with. Grey yarn came to me second-hand, and I'm pretty sure it was from Big Lots (which does not have any locations near me)- it didn't have any brand on the label, it didn't even say what size hook or needles to use. Just "try this yarn for all your craft needs". Whatever. I did.

Monday, December 29, 2014
Pillows from Grandma (and Me)
Going through my late grandma's house, we've come across any number of unfinished craft projects. There were several projects that were embroidered for, but left unfinished- some needed to be framed to be hung on the wall, some were intended to be pillows that were never ruffled or backed.
For Christmas this year, for my family, I decided to finish some of those projects as pillows. The two that I decided to give my parents were originally intended to be framed and hung, but that's really not my parents' decorating style, so I made them into "charm pillows" (their term) for their couch. For theirs, I found some green-edged ruffle trim in my 'Trims' bucket, and I bought green (Mom) and yellow (Dad) fabric to finish them off- for the sides of the embroidered piece, and the backing.
The two that I picked out for my siblings were originally intended to be pillows- and they both came with their trims. The one that went to my sister ("little seeds of kindness...") also came with the fabric for the back. I did hers first, and without thinking, sewed the lace-ruffle on flat to the fabric, making it stretch around the edges, and pull and twist at the corners, and making me have to rip the stitches out and re-do. I planned better with the second one, and the trim I used for my parents' came pre-basted into itty-bitty tucks.
So for this project- my grandma did all of the embroidery, and she did the quilting for the top of my brother's pillow (far right). I attached the ruffles, and the pillow backing, and bought pillow forms for all. She definitely did all the hard work, I just finished them off.


Sunday, December 28, 2014
Tablecloth

The hardest part of this project was dealing with the size of the tablecloth. I used one fabric for the top, and lined it with a plain peach colored fabric on the back, and neither was big enough alone to cover the whole table with anything hanging off the sides. Both fabrics had to be cut on the end, and supplemented on the sides, and then matched up just right around the edges. I also tucked two layers of 100% cotton batting in the center of the tablecloth, and attached them at regular intervals, making 4 lines perpendicular to the direction of the batting- this allows the table cloth to be used without hot pads. I used one of the few decorative stitches my sewing machine offers to topstitch the edges.

Wednesday, December 17, 2014
Dragons!!
This quilt is finally done!
Well, it's running through the wash for the last time now, and then I'll clip the yarn ties. I've found that if I clip them before washing, they end up with virtually no tail, and I like to give them about a 3/4" tail.


The quilt is NOT finished in this last picture (you can, ahem, see the quilt guts), I just realized a little late that there were no pictures that showed the fabric on the back of the blanket.

So basically, it's not "finished" in any of these photos, but I'm too excited, and also too done with it to take more. Maybe Rainy Pinni will offer up a picture of her little niece with the blanket once it's really finished.
Saturday, November 1, 2014
For Baby McCarter

Finished this yellow crocheted baby blanket this afternoon. A new stitch pattern for me, it was surprisingly easy- you use the exact same pattern on both sides, and flipping the blanket when turning makes it so there really isn't a true front or back to this blanket. Which is perfect for a baby blanket! I'm pretty pleased with how the pattern turned out. I also had an orange/yellow gradient colored yarn that I was going to trim the edge of the blanket with, but it was too chunky, and looked awkward next to the baby-weight yarn pattern, so I scrapped that idea. This one goes to a coworker of mine who is expecting early next year.
Monday, October 13, 2014
Baby Booties!
I made these! And now, Baby is finally big enough to wear them (and still has some room to grow with them).


Sunday, October 5, 2014
How to Train Your
Watercolored the stormy sky, green grass, and a couple mountain peaks in the background first. Then appliqued the outline of the purple dragon body onto the fabric, and embroidered over the top of it.


Saturday, October 4, 2014

Sunday, September 21, 2014
Block Printed Dragons
I hadn't block printed since high school, so I was a little nervous about this one- but it's pretty simple, and the tools don't take up as much space as, say, screenprinting... This was fun! I used screenprinting ink, because neither I or the art-supply-store clerk knew if block printing ink would wash out, but screen printing ink will stay fast. I initially printed the pink one with a pink spot in the middle of the eye, but I ended up not liking how that looked, so I put a bundle of French knots over it. I also backstitched the upper edge of the purple dragon's wings. I've still got one more color of ink, and one more "plate" that I can carve up, so I'll probably add a couple more to this group of dragons!


Sunday, September 14, 2014
Paperbag Princess Dragon

On this one, I knew I couldn't get the watercolor look of the original through embroidery (or maybe I could, but I actually want to finish this project someday). I wasn't sure what I had that would get that watercolor look, and stay on the fabric through washing, so I grabbed all of my old markmaking tools from art school, and made a couple different backgrounds on a length of the extra white muslin. I was so sure the Easter egg dye was going to work- but it only made flat areas of color, and washed out completely when I washed it. My friend that helped me was so sure the colored pencil was going to wash out- but that ended up staying. Permanent markers worked as expected- they were permanent, and though the egg dye washed away, the blurring of the markers from the egg dye stayed. The winner was some fancy watercolors- the kind that come in little tubes and are not made by crayola. They looked pretty and right when I laid them down, and were mostly colorfast through the wash and dry I put them through. There was a little dulling and blurring, but little enough that I chose to go with that one.
My friend's grandma called with a trick for laying crayon colors down onto fabric the day after I did all of my experimenting. It was almost like she knew what I was working on, all the way from Texas! I don't actually have any crayons, but I might have to get some.

Monday, September 1, 2014
Mercer Mayer Dragon
I really didn't want to draw a dragon, so I pulled out every book from my bookshelves that I thought might relate to dragons somehow, with the idea of looking through them for inspiration (see: "procrastination"). One of the books was Mercer Mayer's "Little Critter's The Fussy Princess"- a story Little Critter tells his fussy little sister to make her fall asleep at bedtime. It has a dragon. I ultimately decided to hell with drawing my own dragon, this illustration was super cute, and would take a couple weeks of Sunday mornings to embroider, so I traced and went for it.


Sunday, August 31, 2014
Baby Blanket
Trying out a new stitch pattern, and trying to use up yarn that I already have- the white with pink tones is all gone now, and the pink is almost there. Made a border all the way around with the pink, using double crochet stitches.


Sunday, August 17, 2014
Baby Blanket
I haven't given up on yarn! I may be working on this big embroidered dragon blanket, and another quilt (bowtie squares), but I have not given up on crocheting! This baby-sized blanket finished off two skeins of yarn, one (yellow) that had been sitting around my apartment for a couple years (lets not talk about this), and the other (multi) that came out of my grandma's basement, and had no matching skeins or tags with it. I had hoped to get my cat to crawl into the laundry basket, one of her favorite spots, and take a nap on it, I even tried luring her with treats, but she just ate them with her back all arched up and hopped out- regardless, you can get an idea for how big it is.


Sunday, August 10, 2014
Embroidered Dragon #2


Another dragon drawn by NSNC, interpreted by me. I'm not totally sure I want to continue doing flame like this, but it works alright for this one. It's too oddly shaped to really satin stitch particularly well, and I do want to incorporate a couple shades of red and orange (there are multiple colors here, though it's hard to tell with my camera...). I could attach fabric the way I did with the wings, but I don't really want to do that, I want it to look a little more organic, and not so defined and flat. I do like the way the multi-colored thread worked out for the line along the ridge of the dragon's back and the dragon's horn. I used a slightly lighter brown for the leg and shoulders, and I like the way that turned out looking as well.
Sidenote: Somewhere along the line, either with this dragon or the one previous, I managed to get wunder under glue all over the face of my iron in the process of attaching the wing fabric to the square fabric. This was very annoying, because any time I would heat the iron up, it would start sticking to whatever I was ironing. So I was using a scrap to keep from getting it onto the square, but then it would stick to the scrap, so I'd have to keep unsticking... Anyways, after last using goo-gone on the tape marks from carpet on my grandma's hardwood floors, I decided there was no reason not to use goo-gone on my iron. I started out with the iron cold, and it didn't do much (glue was solid and hard and not sticky when cold); next I turned the iron on to its lowest setting, just enough to warm up the glue- and it worked like a charm! No more sticky iron! All hail goo-gone!
Sunday, July 27, 2014
Embroidered Dragon #1

The next phase of my dragon blanket project involves interpreting drawings into embroidery. On this one I chose to use a plaid fabric for the wings, to fill in the space quickly, and provide an interesting pattern. I satin-stitched the sections of the dragon's stomach, and chose to outline the rest of the dragon, to keep it from being too heavy. I also back-stitched around the edge of the wings- they are attached with the glue from Wonder Under, but it is ultimately going to be on a baby blanket, and needs to be able to be washed in a standard washer/dryer, so I decided it would be smart to double ensure that the wings weren't going to peel off. My friend NSNC drew the dragon for this square.

Sunday, July 20, 2014
Cross-Stitch Complete!

Yay! All of the dragons for the baby-sized dragon quilt that will be cross-stitched are done (except for the French knot eye on the bottom left purple one- I swear I'll get to it)! The other dragons in the pattern book are a bit too ambitious, or too large for these squares for this project... or else they're the single Asian-style snake dragon with no bordering that would look totally out of place on this project. I finished (mostly) the purple dragon this morning, and started in on the next phase of the project- embroidering dragons based on drawings, with cloth wings appliqued. Pictures soon!
Monday, June 23, 2014
Burda 9802

I also cut out a whole bunch of quilt square pieces, but didn't get to sewing them. I hand hemmed a hankie that my grandma embroidered. I determined that my rotary cutter was, in fact, quite sharp, by slicing my finger. I started crocheting another baby hat. I had grilled cheese for lunch. And most importantly, my table is now clean again! I put all the scraps and equipment away, IN THE SAME DAY. :)
Sunday, June 15, 2014
Pink Blankie

I thought I would crochet less with my new job, but I'm doing pretty good! On the other hand, I watch a lot more TV now. I'm busy catching up on the last decade of popular TV... this blanket may be baby pink, but it watched a lot of the first season of The Sopranos with me. I learned a new stitch pattern for this one, and then worked and watched my shows until it was done.
Saturday, June 14, 2014
Wee Dragon

As with just about all of my projects: I seriously don't like ironing.
Just a little dragon, adding to the collection. This one was pretty quick- it's small, and only four colors + black. I used the same large-gauge of waste canvas as I did for the last two dragons, but decided to go with three strands of floss for this one, just to flesh it out a little more because it is so small.
Sunday, June 1, 2014
Not a turkey

This dragon looked like a turkey at one point during the cross-stitching process, when it was all wings and neck, without tail. Also, please note: this dragon has an eye! I learned how to make French knots, thanks to my great 'Embroidery Samplers' class at the Lillstreet Art Center. I gave this dragon an eye, and went back and added them in to the previous two, as well.
Sunday, May 11, 2014
For Baby Boy Soto

I taught myself a new stitch pattern out of one of the books I got for my birthday, and made this solid blue baby blanket for my coworker's sister, who will soon have a baby boy. I used the same color to single crochet border around the edge twice.
Friday, April 18, 2014
Dragon #2 (actually number one, but two in blog posting order)

So... finding dragon-print fabric has proved to be harder than expected, so I'm "giving up and giving in" and going to the art store this afternoon to pick up some linoleum blocks and fabric-safe printing ink to get a bunch of these squares done quicker than cross-stitch will allow (I also did some math this morning, and discovered that I was going to need 24 blocks, so... at least half of them will end up printed rather than stitched). My Sunday mornings stitching at Sol won't get this project done until the (currently not-yet-born) baby is a toddler if I stitch them all, so it'll be a mix of printing and stitching. WILL STILL BE NEAT.
Sunday, April 13, 2014
The Burninator

Part of a larger project- blocks with cross-stitched dragons will be put together into a baby-sized quilt. This is the second one I've finished (no picture yet for the first), and they are both missing eyes because I don't know how to do French knots yet. But I can go back and put them in later!
Saturday, March 29, 2014
Baby Blanket Trio
Saturday, March 8, 2014
Large Lavender Afghan

This blanket turned out SO MUCH larger than I had planned. What was supposed to be a quick project became a several-months-long commitment. The trouble is, with the basketweave stitch, you do lose some of the width once you start the pattern, it gets scrunched up with the front- and back- post stitches; unfortunately, you don't lose quite as much as I anticipated. I don't know why I thought it would be so much, I've done this pattern before... but the blanket ended up huge. By the time I realized just how enormous I had set the width at, it was long past time to pull out stitches and adjust. I had already spent some serious time working on it, and had to just commit to the size.
I did the basketweave pattern for quite a while, and then I got tired of it, and had to do something else, so I added in a five row stripe of single crochet. I added another one later, separating the basketweave pattern into three equal sections. Ultimately, I like the way that turned out looking.
What I don't like, is that the blanket ended up being just not-quite square. I generally aim to make blankets that are rectangular (or actually square, because they are composed of squares), and I think it would have been nice for a large afghan to be distinctly longer one way... but I was already three one-pound skeins of baby yarn in, and I really really did not want to do another. And it's still warm and cozy and soft.
Wednesday, February 26, 2014
"Uglydoll"

My friend is having a little nephew in a couple months, and asked me to make an Uglydoll-style stuffed animal for him. I'm not about straight plagiarism, so I did some google-ing, and then built on their product, using the fabrics that I had. This toy got swirly eyes, and a navy blue backside. I used some felt I had for the eye pupils and the mouth. And I finished off all the poly-fill stuffing I had left!
Monday, February 24, 2014
Harvest Hexagons

A year or two ago, I made a hexagon blanket out of some yellow wool yarn that my grandmother had given me (and given me a lot of). I gave the blanket to my sister, as she had a friend with a baby that was only wearing/using natural fibers. Apparently that baby loved the blanket, and the couple now has a second baby, who also loves their older sibling's blanket. My sister asked me if I'd be willing to work on a second blanket, for the second baby. She said she wasn't sure if Baby 2 was more attracted to the wool or the hexagons (or perhaps just Baby 1's possessions), so I decided to pick up some more wool, and revisit the hexagons.
Baby 1's blanket was yellow, but for Baby 2 I got to pick the colors, and chose to go with a leaf green and cream. I organized these hexagons in stripes, and this blanket is more rectangular than the first (if I remember right, the first ended up shaped like a large hexagon). I used some of the leftover green to go around the edge once in a single crochet border. I'm still not totally satisfied that I can't get these hexagons to lay flat, but that's something to keep working on.
Saturday, February 22, 2014
The Dark Scraps

This project was conceived as a way to get rid of, at least reduce, my stock of "dark" scraps (I save teeny skein remnants in either a dark pile or light pile- the light pile is easy to make baby hat brims and such out of, the dark pile tends to stick around). I did have to buy the gray yarn, but the other colors from the stripe and the border all came out of the scrap pile.
I chose to use a different stitch for the stripe, that would utilize the different colors by sending a spike from one row down into the previous row, creating a more interesting effect than just stripes layered on top of stripes. As I got closer and closer to the end (I made the smaller section of gray first, then the larger one), the gray felt like it was getting overwhelming and dreary. The dark scraps hadn't been completely decimated yet, so I decided to use some more of them to create a small, two row border. I just used a basic single crochet stitch for this, using back loops only so that the colors would be more visible, especially in the inner row.
Saturday, February 8, 2014
The Sock Pillow
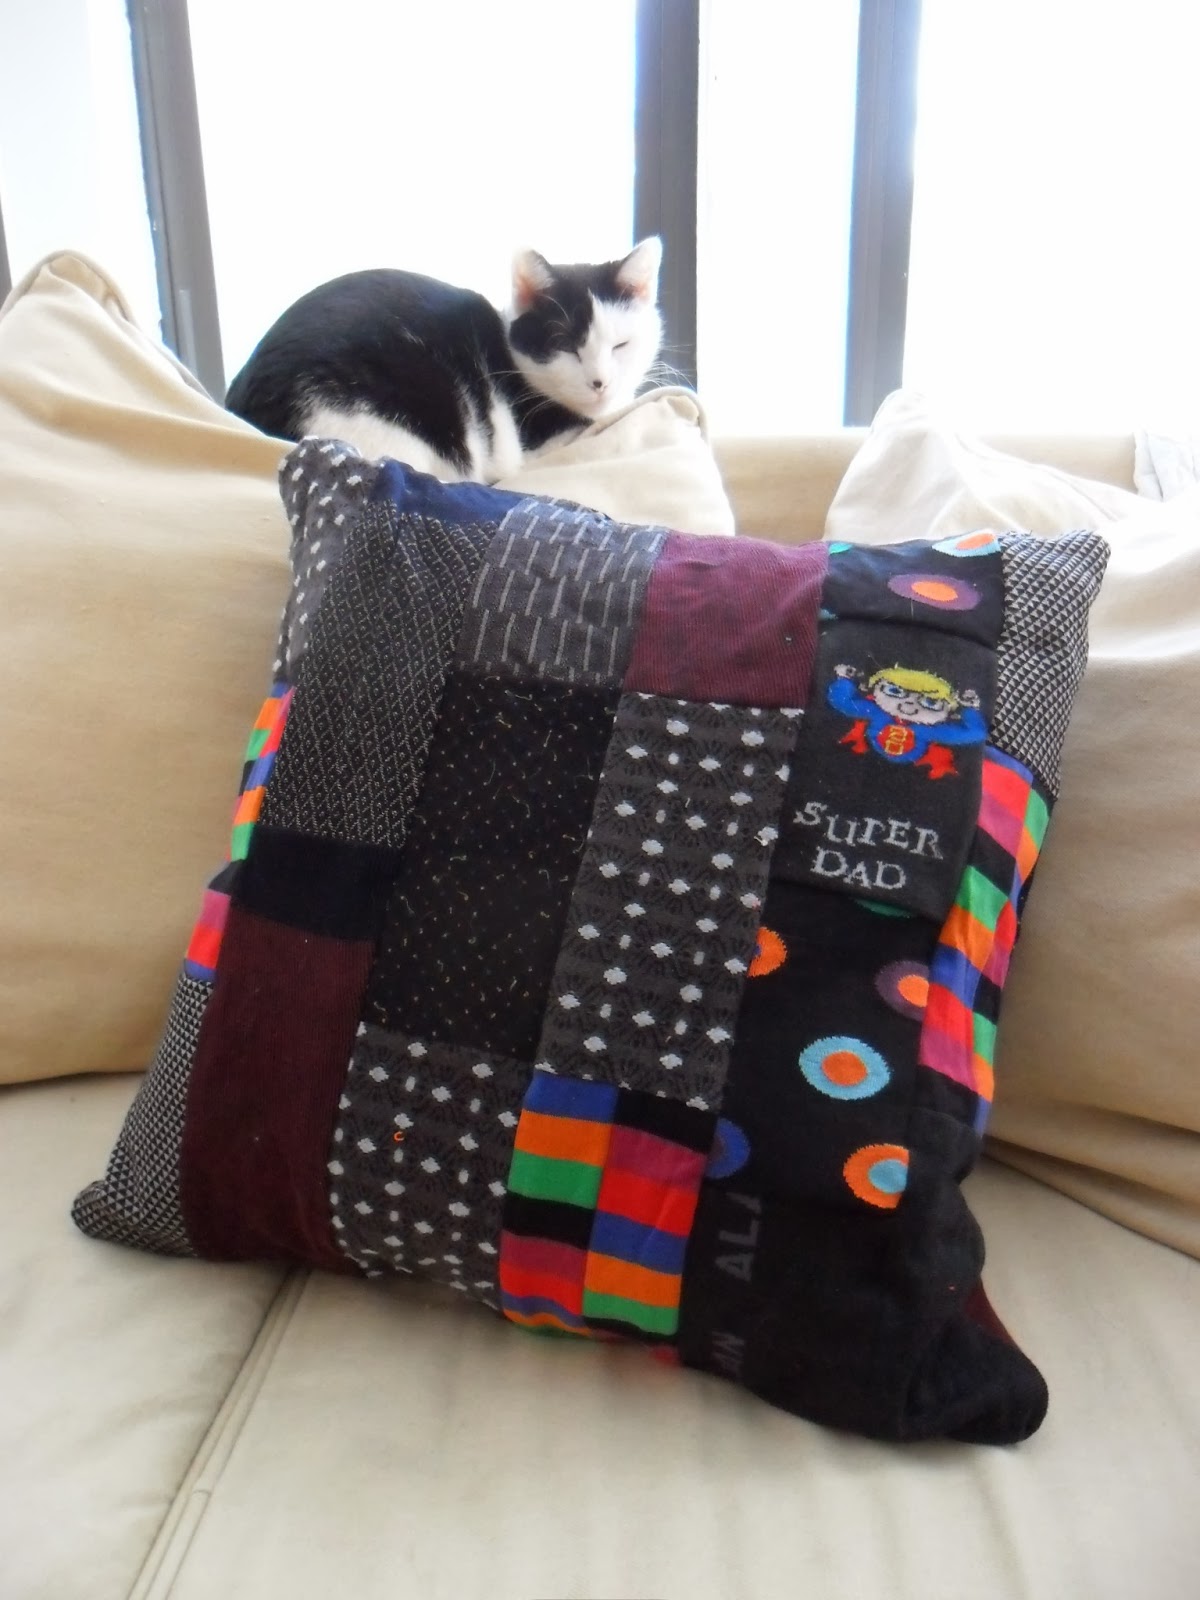
I was hired to create a pillow out of socks. My client said she wanted to do something for her father, who was well-known for his many-colored socks, but no longer needed them. She thought a pillow might be a good way to use them, with the ultimate goal of giving the pillow to her father to continue to enjoy his socks.
We met, and we went through the socks that she had, picking out the ones that were special to her and her father.
I chose to use the leg part of the sock, as that was the part of the sock that had the most usable fabric for me, and would best be able to represent the patterns and colors on the socks. The binding at the top is tighter than the leg part of the sock, and the heel piece won't lay flat. In addition, the part of the sock that goes around the arch of your foot is pretty short and small when not being stretched by your foot.
First I measured all the socks, laying flat, and decided on a couple different sizes of blocks to create (using the measurements of the pillow form to ensure that it would all match up correctly. I then made three different pattern pieces for each different block size, and started cutting the socks up. Some laid flat wider, and I was able to get four blocks out of the pair of socks, others were tighter and laid flat narrower, and so I had to cut them open to create a block wide enough, resulting in two blocks for the pair of socks.
Once the blocks were all cut, it was just a matter of putting them all together, first in columns, and then organizing the columns so that two of the same sock didn't end up exactly next to each other. I did end up with a couple that matched around the edges, but it was more important to me to make sure that when a side of the pillow was laid flat, that none on that side matched up.
After both sides were sewn together around the edges, I attached the top corners of the pillow form to the top corners of the sock-pillow case to keep it from moving around too much inside. I then turned the casing right side out around the pillow form, and hand-stitched the gap in the bottom closed.
My client was very happy with the final product, and I was very happy to have had this project to work on! It provided a couple new challenges for me, sewing-wise, and gave me an opportunity to do something different from what I have been doing recently, and what I have done in the past.
Monday, January 27, 2014
Why Not? Blanket
The yarn was on clearance. I bought all that they had, and made this little blanket. Yarn was super chunky, so I went with the new square pattern that I learned two posts ago- to avoid having too many huge holes. Blanket is thick! Warm! About a yard x a yard.


Sunday, January 19, 2014
Small Multi-color Afghan

A long while back, I had some odds and ends in some brighter, pastel colors, and I decided to work it all into little squares, as there wasn't enough of any of them to work out a pattern for something larger. After finishing a couple more projects, and discovering a bag full of old yarn at my parent's house, I had some more scrap yarn to work with, and made up more squares to go with the original batch.
Each square is about 4 inches wide/tall, and I decided to make this blanket 10 squares by 10 squares, to make it larger rather than smaller. It did end up pretty big for a baby; my mom said that it was about "crib-size", but I could also see it being about the right size for a toddler. It's pretty gender-neutral, doesn't really scream all pink! or all blue!. I also added a border around the edge, of one row of single crochet and another of half-double crochet to hold it all together, weave in seams, and add some sturdiness to some of the slip stitch edges on the squares. I used the same white for the border as I used to slip stitch the squares together on the back side.
I did still end up with 3 extra squares, to start off the next little-square project.
Thursday, January 2, 2014
Green Afghan- New Square Pattern

As a reminder, since I know a couple of my friends out there are on their way to becoming aunties and uncles- unless I mention that a project was for someone, all blankets and hats are up for grabs, until donated to charity. Hats go to the UIC hospital, blankets get donated through Project Linus ( http://www.projectlinus.org/ ) to various hospitals throughout the area. So: this afghan could be yours, for your home or as a gift for friend or family member, just let me know if you want it! Otherwise, it will go on my pile and eventually be donated to Project Linus.
Subscribe to:
Comments (Atom)