Monday, December 9, 2013
Hat Donation!
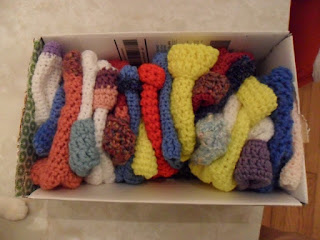
Another 25 or so little baby hats got sent off to the UIC Hospital! Photos taken in my laundry room to protect cat-dander-free integrity.
Saturday, November 9, 2013
Smaller Afghan
I had some leftover pink and purple from other projects, not enough to just toss aside, and all of the same weight. Made alternating stripes with the two yarns, and bordered the whole thing with some fancier yarn that I had a fair amount of (I think I bought it thinking I would make something big, I used to have several skeins, but it ended up just supporting other projects). This picture makes the blanket look big, it's actually only about 4 ft x 2.5 ft (roughly).
Friday, October 18, 2013
Large Afghan
Friday, August 2, 2013
T-Shirt Scrap Rug
When I finished making the t-shirt quilt a couple months ago, I put all of the shirts in a garbage bag, with the intention of taking them out to the dumpster. And then my conscious kicked in, and I just couldn't bear to throw away an entire, full garbage bag of fabric that I KNEW I could do something with. So, I sucked it up and ripped the bag open again, and commenced making this rug from the scraps.

My grandma taught me how to make scrap/fabric rugs when I was very young (my first rug is still in my present bedroom, still in use, just a little one next to my bed), before I had learned how to crochet. She started the project, handed me a crochet hook, and taught me the basic single crochet stitch. Which, after finishing that rug, I promptly forgot, not to make the connection between yarn crocheting and rug making again until I was about 19.

First you tear or cut all the fabric into strips, with slit-holes on either end, which you use to loop the strips into one long strand. Then, you commence with the crocheting (using the largest hook you can find at your craft store), being super careful to add enough slip stitches on the ends, and to keep your stitches loose enough that the rug can expand without folding up on itself. Since I had so many shirts, I started with the black ones in the center, then moved on to the navy ones, the coloreds, and the white/greys. The blacks and navies tend to blend together, if I had to redo it, I would probably separate them.

My grandma taught me how to make scrap/fabric rugs when I was very young (my first rug is still in my present bedroom, still in use, just a little one next to my bed), before I had learned how to crochet. She started the project, handed me a crochet hook, and taught me the basic single crochet stitch. Which, after finishing that rug, I promptly forgot, not to make the connection between yarn crocheting and rug making again until I was about 19.

First you tear or cut all the fabric into strips, with slit-holes on either end, which you use to loop the strips into one long strand. Then, you commence with the crocheting (using the largest hook you can find at your craft store), being super careful to add enough slip stitches on the ends, and to keep your stitches loose enough that the rug can expand without folding up on itself. Since I had so many shirts, I started with the black ones in the center, then moved on to the navy ones, the coloreds, and the white/greys. The blacks and navies tend to blend together, if I had to redo it, I would probably separate them.
Thursday, August 1, 2013
Donation 2- May 31, 2013

I didn't count how many blankets were in this one- several! Ran them through the wash with a load (30?) of little baby hats (not pictured), which also got donated. Blankets got distributed through Project Linus (drop off point- Vogue Fabrics in Evanston), hats went to the UIC Hospital (via a coworker).
Wednesday, June 19, 2013
Yellow Baby Afghan

Another little baby blankie, made of yellow and yellow-toned squares. Most of the yarn was given to me by my grandma, who works with a couple of knitting charities in Wisconsin (they agreed that she could give me some of their free yarns as long as I was donating and not selling- "what difference does it make if it goes to a baby in Illinois instead of a baby in Wisconsin?"). However, it's free yarn, so there's no guarantee there will be a lot of the same color. I looked at what I had sitting around, and put together all the yellows I had, and then added 2 more small skeins fresh from JoAnn's, to round it all out. I used one of the skeins I bought to connect all the squares, and then the other to border the whole thing (but only had enough left to go around once).
Saturday, May 11, 2013
Dress to Skirt


Renuka had this dress that fit her really awkwardly on top, and subsequently she didn't wear it a whole lot. So, we spent a couple hours cutting it and reforming it into a skirt for her. I put in a new zipper with hook and eye, created some darts in the back, and took it in a little on the sides. The waistband is a little thinner than I'd normally like, but I cut it off right underneath the original decorative cummerbund area (I'm sure there is a technical term for waist paneling, but I do not know it), and there wasn't much extra fabric to create the waist with.
Friday, May 10, 2013
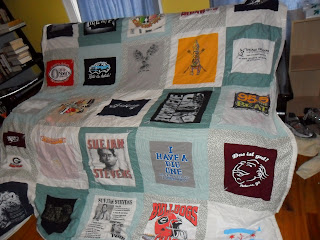
T-Shirt Quilt

For Parker, I made a queen-sized t-shirt quilt. In the past, I've generally avoided working with knits, figuring their stretchiness is a liability, and I'm bound to stretch them to all kinds of weird shapes in the process of sewing them. To that end, I used fusible interfacing on the back of some of the thinner and stretchier shirts (initially I intended to face all of them, but my Hancock's closed during the making of this quilt, so I had to make due with 'whatever interfacing they had left' during their liquidation sale). I also bordered each shirt-square, to give each shirt a uniform size, and also to create more stability in the final product, and while sewing it all together. Clearly, I've got something against stretchy fabrics.
Parker's bedroom walls are a lovely green color, so I went with a couple shades of green for edging the shirt-squares, and I found a light green king-size sheet at the thrift shop that was just right and made a wonderful backing. Most of the border fabrics I had lying around, but I did have to buy the white-tone that borders some of the squares.

A queen-size quilt was also something new for me- it's SO BIG. Seriously, ENORMOUS. Like, it's so big that when it came time to make the sandwich, I got my neighbor to go down to the tennis courts at the park with me, because neither of us have floor space to lay this out without some serious furniture moving (I also have a cat, who likes to 'help' me with that kind of thing). So we went to the park, and laid it all out, and pinned the edges together. Would have liked to pin more throughout the center, but the weather did not cooperate with us. Luckily, it wasn't too much of an issue when I went through and tied the thicknesses together with the yarn ties.
Originally I thought I was going to try and do the binding all by hand- in the past I've felt like my machine skills on the binding were crummy & lazy at best. But after binding for about an hour, and only getting about 2 feet done... I decided to give the machine binding another shot. And it worked out better than it has in the past, whether due to being more aware and careful, or skill improvement, who's to say... Regardless, there were still two little 1" spots where I got the binding just right on the top, but it didn't catch on the bottom- these I fixed up with a couple well-placed hand stitches; Five stitches are easier than five thousand. :)
One final note, if you haven't already figured out, big quilts are RIDICULOUSLY hard to photograph nicely in full.

Sunday, April 28, 2013
In Progress
Working on a t-shirt quilt for a friend these days (have actually been working on it for quite a while..). Full details when it's finished, but for now- rectangles cut from the shirts, framed by standard cotton quilting fabric for stability (some of the cotton knit is backed with fusible interfacing as well), and pieced together.


Tuesday, February 5, 2013
Monday, January 14, 2013
Chunky Yarn Blankie
I had just a little bit of chunky purple yarn left, and had to use it somehow. I had also made myself an infinity scarf out of a shiny cream colored yarn that I ended up never wearing. So, I bought a single skein of chunky pink yarn (same brand/style as the purple) to extend what I had, then went ahead pulling out my scarf and making stripes of pink (and one of purple) every six rows. Ended up not having enough pink leftover to border the whole thing, so I made a thick border row on one edge to tie in all the fringes left from changing colors, and then slip stitched an edge on the opposite border, for a little bit of balance. I'm still not super thrilled with the uneven border, but the goal is to be rid of some of the piles of yarn, not add more chunky scraps that will be hard to use with just about any other yarn weight ever.
Subscribe to:
Comments (Atom)


