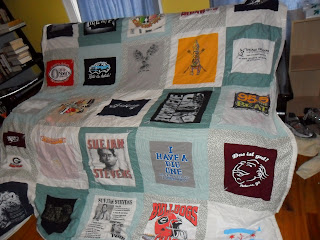
For Parker, I made a queen-sized t-shirt quilt. In the past, I've generally avoided working with knits, figuring their stretchiness is a liability, and I'm bound to stretch them to all kinds of weird shapes in the process of sewing them. To that end, I used fusible interfacing on the back of some of the thinner and stretchier shirts (initially I intended to face all of them, but my Hancock's closed during the making of this quilt, so I had to make due with 'whatever interfacing they had left' during their liquidation sale). I also bordered each shirt-square, to give each shirt a uniform size, and also to create more stability in the final product, and while sewing it all together. Clearly, I've got something against stretchy fabrics.
Parker's bedroom walls are a lovely green color, so I went with a couple shades of green for edging the shirt-squares, and I found a light green king-size sheet at the thrift shop that was just right and made a wonderful backing. Most of the border fabrics I had lying around, but I did have to buy the white-tone that borders some of the squares.

A queen-size quilt was also something new for me- it's SO BIG. Seriously, ENORMOUS. Like, it's so big that when it came time to make the sandwich, I got my neighbor to go down to the tennis courts at the park with me, because neither of us have floor space to lay this out without some serious furniture moving (I also have a cat, who likes to 'help' me with that kind of thing). So we went to the park, and laid it all out, and pinned the edges together. Would have liked to pin more throughout the center, but the weather did not cooperate with us. Luckily, it wasn't too much of an issue when I went through and tied the thicknesses together with the yarn ties.
Originally I thought I was going to try and do the binding all by hand- in the past I've felt like my machine skills on the binding were crummy & lazy at best. But after binding for about an hour, and only getting about 2 feet done... I decided to give the machine binding another shot. And it worked out better than it has in the past, whether due to being more aware and careful, or skill improvement, who's to say... Regardless, there were still two little 1" spots where I got the binding just right on the top, but it didn't catch on the bottom- these I fixed up with a couple well-placed hand stitches; Five stitches are easier than five thousand. :)
One final note, if you haven't already figured out, big quilts are RIDICULOUSLY hard to photograph nicely in full.